My name is David Flintham and I’m a member of the Royal Geographical Society. I’ve had a long interest in history, especially military history.
Since I was a small boy I have been fascinated by castles and fortifications and have travelled extensively not only in the UK and Europe but as far afield as North America and South Africa just to explore battlefields and military sites.
This is my passion and something I would like to share with you as we explore Berwick-upon-Tweed. With its largely intact fortifications dating back to the Tudor period Berwick is one of the most impressive fortified towns of Britain.
Here in Berwick we’re about half way between the cities of Newcastle-upon-Tyne and Edinburgh. Berwick is England’s northern-most town. This walk will tell the story of Berwick going back over nine hundred years. It’s not just about the history of the town but about how geography has influenced history and how history has shaped geography. You’ll find out why Berwick’s location on the northeast coast resulted in such a dramatic history; you’ll discover how military fortifications made the most of characteristics of the physical landscape; and you’ll have chance to think about the connections between Berwick’s military history and people’s sense of identity.
The walk begins at Berwick railway station. The route starts with a short circuit down to the river and back up to the station then goes around the town walls finishing at the garrison which is on the edge of the town centre and just a short distance from the starting point. It is just under 3 miles long and mostly on pavements, paved paths and city walls. There are also optional grassy paths. For most of the walk you are on ancient monuments and heritage sites so please respect them and watch your footing. I hope you enjoy the walk!
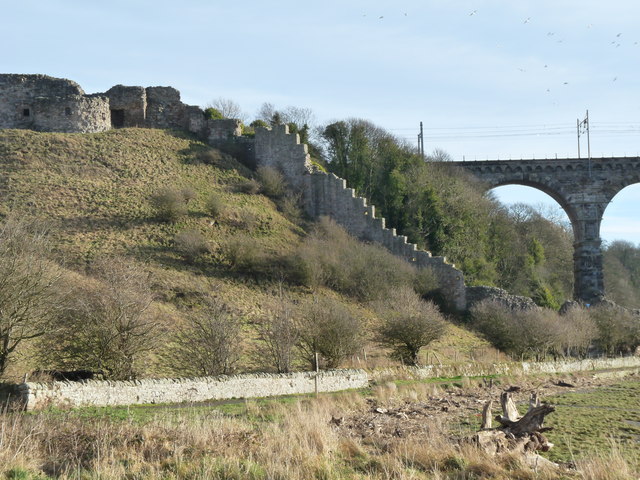
From the station entrance turn left with the train tracks on your left and the car park on your right. Go up the steps and turn left to cross the bridge over the railway. Where the main road forks look for a signed footpath on the left side. Go through the gate and follow the path as it snakes downhill. Go through the next gate. Stop at the curved bench overlooking the river, viaduct and castle walls.
NOTE: Stops 2 to 5 involve a modest – but highly worthwhile – descent and ascent. If you are unable to manage the terrain listen to these stops within the station grounds. Then go through the small gate near the post box and down a few steps (these steps are actually private property but the owners permit public usage). Turn right down the driveway of Castle Vale B&B. Stop beneath the ruins of the stone tower on the right just before you reach the buildings and listen to Track 6.
2 The border line
All across the world, rivers are used as boundary markers. In the UK they mark boundaries between the jurisdiction of different local authorities or counties. In other places they mark boundaries between countries.
The River Tweed here is the obvious choice for marking the boundary between England and Scotland. Actually the border is about two-and-a-half miles north of here between Berwick and the small town of Eyemouth. However the border hasn’t always been there.
Almost 2,000 years ago the border was about 50 miles south of here at Hadrian’s Wall which was the frontier between the Roman province of Britannia and the area of Caledonia to the north. The Tweed became the border between Scotland and the Anglo-Saxon kingdom of Northumbria after the Battle of Carham in 1018 but after that the border moved many times and Berwick has been caught in the middle, changing hands between England and Scotland at least 13 times in four centuries. This walk tells the dramatic story of Berwick and the shifting border.
We begin our story of Berwick nearly 900 years ago. The King of Scotland was David. Before ascending the throne, Berwick was part of his Principality of Cumbria, his border territory; after becoming King it became fully part of Scotland and was a Scottish burgh (burgh is the Scottish word for town).
In fact Berwick was the first ever burgh to be established. It was a port and a commercial centre with a large population and by the thirteenth century was one of the most prosperous merchant towns in Britain which also brought considerable revenue to the king through customs taxes.
Berwick was in an important location for King David’s ambitions for expanding his territory southwards. So successful was he that ultimately Northumbria, much of Cumbria and parts of North Yorkshire were incorporated into his realm. That’s just the start of the dramatic story.
David’s grandson, King William I of Scotland, known as William the Lion, was captured by the English at Alnwick a few miles south of Berwick in 1174. As a result Berwick Castle was forfeited to the English crown. Then during the 1190s King Richard I of England – Richard the Lionheart sold Berwick back to Scotland to finance his crusades in the Middle East.
Then in 1216, no longer able to put up with the failed leadership and despotic rule of King John (he of Magna Carta fame), the country’s leading noblemen, the Barons, rebelled. The Barons were supported by the future King Louis VIII of France in the south and by Alexander II of Scotland in the north. Indeed such was the level of hatred towards John that many of the northern English Barons switched their allegiance to the Scottish crown. To punish them King John visited Berwick and burnt part of it!
All that to-ing and fro-ing of Berwick between Scotland and England happened in just a hundred year period! Being on the borderline it is no surprise that a series of military fortifications were developed in Berwick during that era and subsequent historical periods. During this walk we will explore defences from four main periods: medieval, Tudor, Elizabethan and eighteenth century periods.
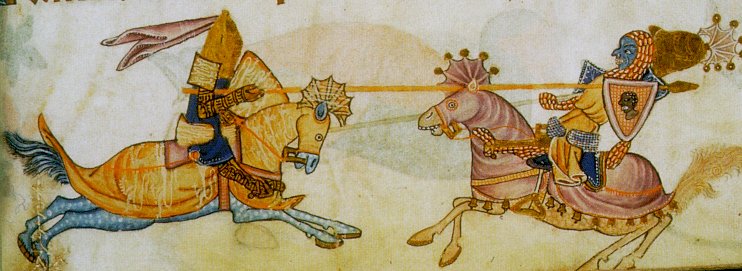
The Third Crusade
Wikimedia Commons (Creative Commons License)
Directions
Follow the path downhill. At the bottom go through the gate and turn left onto the riverside path towards the viaduct. Stop when you have a good view of the castle walls up on the hill to the left.
4 Cliff top position
The first record of a royal castle here is 1160. You can see some of the remaining outer walls from here. Wherever possible those who built castles made use of natural features in the landscape to make sure they were in the best position for defence. Here you can see two natural features which explain why this site was chosen for Berwick’s castle. First the bend in the river allowed good lines of sight of any approaching enemy. Second the castle stood on an isolated hill and this rocky outcrop with steep cliffs would be difficult for attacking forces to climb.
Both the castle and ramparts were constructed from local sandstone; there is evidence of quarrying both up river and near the coast. Local limestone was used to make the mortar for the building.
Now the railway runs right through the site of Berwick Castle. By the time the railway arrived in the 1840s much of the castle’s stone had already been taken away to construct buildings in the town, including the parish church and barracks that we shall see later - so not much is left to see now and we can only walk around the perimeter.
As we already heard, the first written record of a castle here is 1160. By the time of King Edward I of England’s first visit to Berwick in 1291 we know that there were some defences in addition to the castle. Edward had come to Berwick to hear the petitions over the disputed Scottish crown. He chose John Balliol as King of Scotland but the Scots suspected that Balliol was little more than Edward’s puppet so they declared independence and entered into a treaty with France. So Berwick was suddenly Scottish again. King Edward wasn’t too happy about this so returned in 1296 this time with an army of 35,000. The town was well defended but Edward’s forces were able to take the town and castle and killed the garrison and citizens. Having won the town back Edward then set about improving Berwick’s defences and the town became his stronghold for his Scottish campaigns.
Continue along the riverside path towards the viaduct. After following the path through the stone passageways turn right onto these stone walls. Stop on the top.
5 Breakneck stairs
At the last stop we heard how King Edward I took Berwick from the Scots. Here we are at some of the improvements in defences that he constructed after reclaiming the town between 1297 and 1298. Look up from this stone tower base at the wall climbing steeply up the hill to the castle. This is the White Wall. It has a stepped parapet and a wallwalk. For obvious reasons it is known as the Breakneck Stairs! Fortunately there is now a safer path that we have just used to come down the hill.
Originally the White Wall ran right down to the river terminating in a tower. The tower was swept away by floods in the 1540s and was replaced by a gun tower the remains of which you are standing on. There are traces of a fireplace so whilst the gun tower was cramped at least the gunners could keep warm.
Edward I died in 1307 but his son, Edward II, continued the conflict with the Scots. The Scots scored a famous victory at Bannockburn in 1314 but it was not until four years later that the Scots were able to recapture Berwick. They repaired and improved the defences and also made changes to the castle, making it a place of residence.
Continue along the riverside path. Shortly after going underneath the viaduct there are two paths on the left. Take the first path which leads up a set of steps into Castle Vale Park. At the top of the steps turn left. Follow the path as it bends round to the right. Where the path merges with a road, turn left back down the road. This is a private driveway but access is permitted. This driveway follows the original access bridge to the castle and the twin towered entrance gate and south tower can be seen here. Stop beneath the ruins of the stone tower on the right just before you reach the buildings.
6 Berwick changes hands again
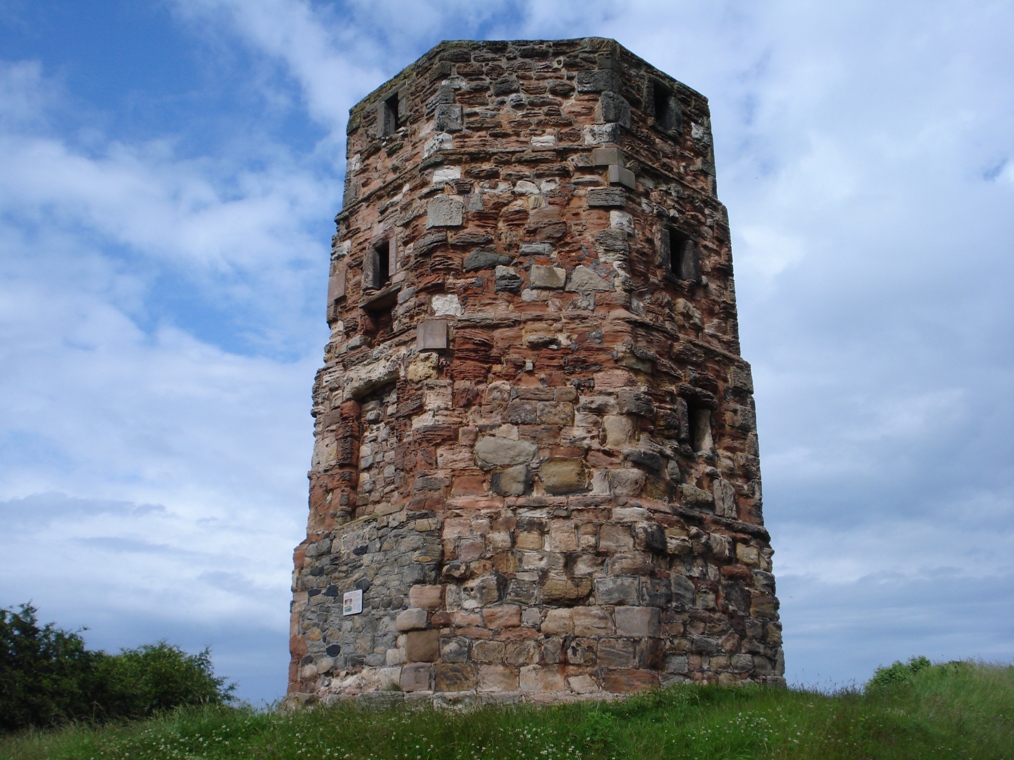
We’ve already heard about a succession of English kings: Edward I seized Berwick and strengthened its defences; Edward II then lost it to the Scots; then came Edward III. Two miles north of Berwick is Halidon Hill. It was there in 1333 that Edward III defeated the Scots and retook Berwick. Like his predecessors he set about improving Berwick’s defences.
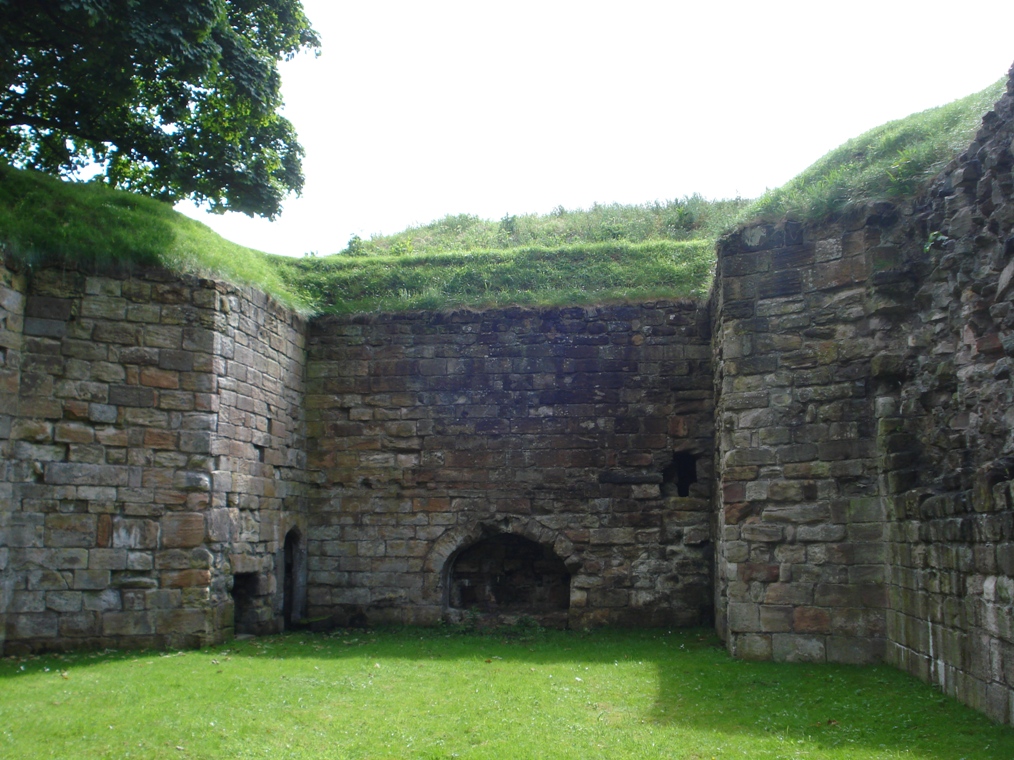
In its heyday the castle would have been an impressive structure. Around the walls were nine towers. This is one of those towers and is known as the Constable’s Tower named after the person responsible for the castle in the absence of its lord. It dates back to the fourteenth century.
You can see the polygonal shape of the tower and the fishtail-shaped arrow-slits. The stonework is of a high quality and offers a tantalising hint of how the rest of the castle would have looked. Inside the castle was an array of buildings including royal apartments, a great hall, a chapel and a kitchen.
Continual maintenance and improvement of defences was essential because there was no respite from Scottish raids. Indeed the Scots occupied the town for several months from November 1355 damaging some of the defences when they left and raided again in 1367 and 1378.
Artist’s impression of Berwick Castle in the 14th century
Courtesy of Jim Herbert
Directions
Directions 6 Walk up the driveway of Castle Vale B&B and follow it round to the right. At the road turn left and follow it to the junction. Cross carefully and go straight across into High Greens. Go a short way along High Greens and immediately after passing a school playing field on the left hand side turn left into Bell Tower Place. Follow the road round to the right and along towards the end of the houses. Go across the grassy area. Stop by the tower.
NOTE: For a shorter walk omitting stops 7 to 11 retrace your steps through the gate into Castle Vale Park. Pass the top of the steps that you came up and follow the path around to the right. After the viewpoint of the viaduct follow the path up the steps. At Tweed Street turn right. Where the road bends round to the left continue straight along the path. When the path reaches the corner of a high stone wall turn left with the wall on your right. At the road turn right. Immediately after going under the stone bridge turn right. Go through the gate on the right and up the slope. Take the path on the left up onto the viewpoint. Resume the commentary at Stop 12 (Meg’s Mount).
7 Towers and gates
At the last stop we heard that there were nine towers round the castle but the castle was just one part of Berwick’s defences. There was also a wall circling the town.
First we are going to look at the medieval wall dating back to the fourteenth century and later at the major redesign of defences in the Elizabethan period.
The medieval defences developed under instruction of King Edward III consisted of 2 ½ miles of walls up to 11 metres high with 19 towers and five gates. It must have been quite an impressive sight!
The grassy embankment marks the line of the original north wall (but comprises material that slumped forwards when the solid stone part of the wall was removed). The north wall was originally protected by three towers. The middle of these three towers was on the site of this tower, although the construction that you see today is a modified version of the original dating to the 1570s.
We have already heard about all the improvements in terms of expansion of the fortifications and the use of stronger building materials. Another improvement in the defensive capability came from changes in weaponry. The town was first armed with cannon in 1384. When Berwick was recaptured in 1405 by Henry Percy, Earl of Northumberland (who was in rebellion against the English King Henry IV), it was the first time in Britain that gunpowder was used. Just over 50 years later King James II of Scotland became the first monarch to be killed by gunpowder when a cannon exploded during the siege of Roxburgh Castle.
The death of James II saved Berwick from attack but such was the threat from Scotland that the town was returned to Scotland by treaty soon afterwards. However the cost of improving and maintaining the defences was considerable so it was probably with some relief that James III relinquished the town in 1482. So it was back under English control by the close of the fifteenth century.
Follow one of the grass pathways a little further along to the stone walls that you can see. Stop inside this tower.
8 The latest technology
Although we have heard about Berwick changing hands a number of times through the fourteenth and fifteenth centuries on balance it was under English control more than Scottish control. Yet neither England nor Scotland viewed the town as naturally or securely English. Berwick remained on the front line.
Berwick was placed in a state of readiness several times between 1482 and 1530 and during this period its walls and towers were backed with earthen ramparts.
Conflict, actual or threatened, in 1491, 1509- 14 and 1522-24 resulted in further repairs and improvements to the defences.
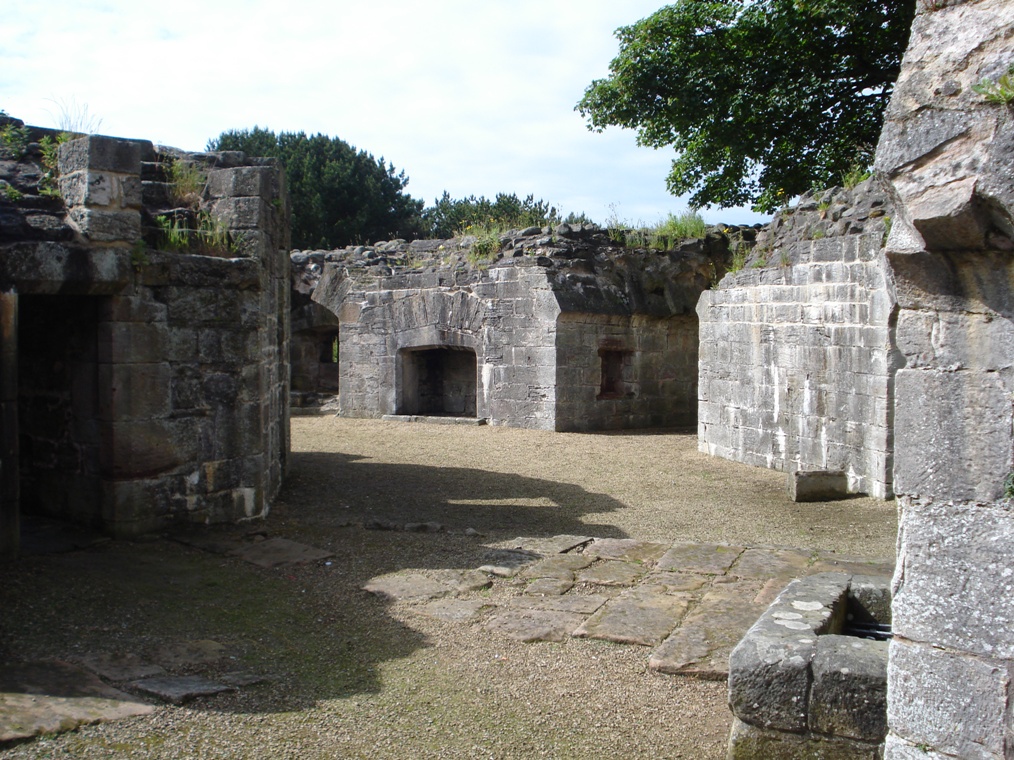
Amongst these works was the addition of an earth bulwark in 1522 to a tower which was on this site. It was rebuilt in stone in 1539 and became known as the Lord’s Mount.
It is said that King Henry VIII may have influenced its design. He was a king who was keen on embracing the latest technology for military structures and artillery; for example his series of Device Forts on the southeast coast of England. The Lord’s Mount here represents something of a first in English military engineering. There are six vaulted casemates, each with its own magazine as well as an upper gun-deck and a total of 15 cannon. It was self-contained with a kitchen and accommodation.
Leave Lord’s Mount towards the last house. Go down the steps and turn left onto the path. At the next junction of paths turn right. Follow the path with the golf course on your left hand side. Continue straight at the next junction of paths. Over the grass on the right hand side is a very large stone wall. Stop in a convenient place looking at this wall.
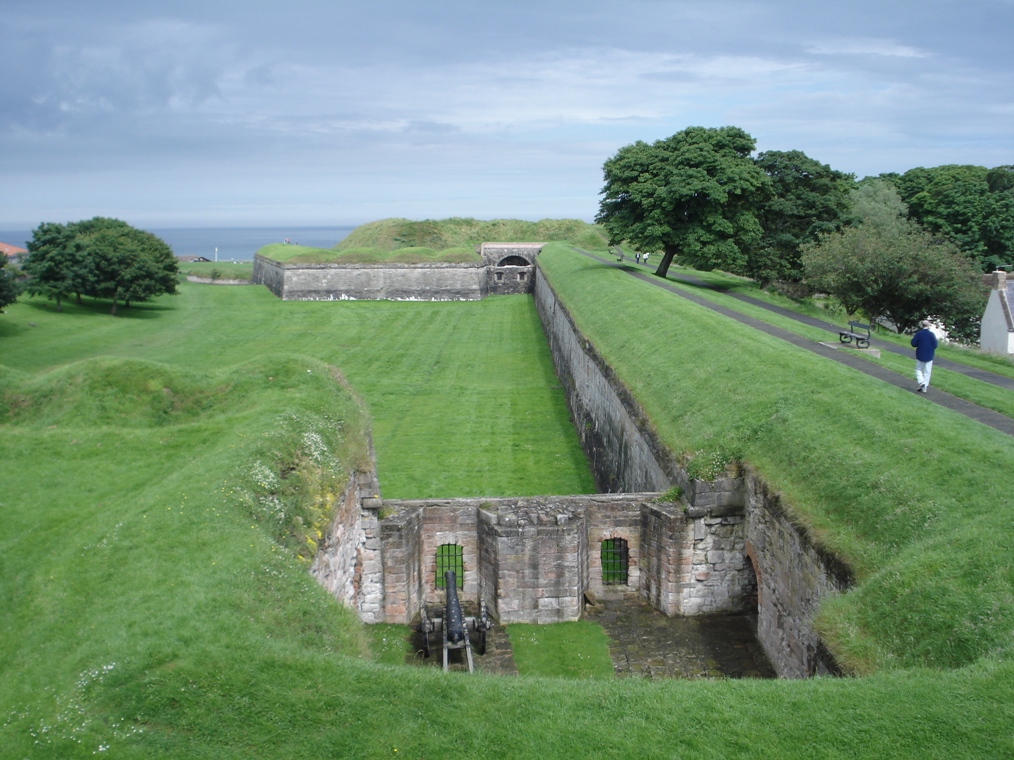
9 Italian design
At the castle and at the last two stops – Bell Tower and Lord’s Mount – we saw some of the town’s medieval wall from 1300s and Tudor defences from the 1500s that are largely ruined. Here we have our first glimpse of the next phase of Elizabethan era fortifications which are largely intact.
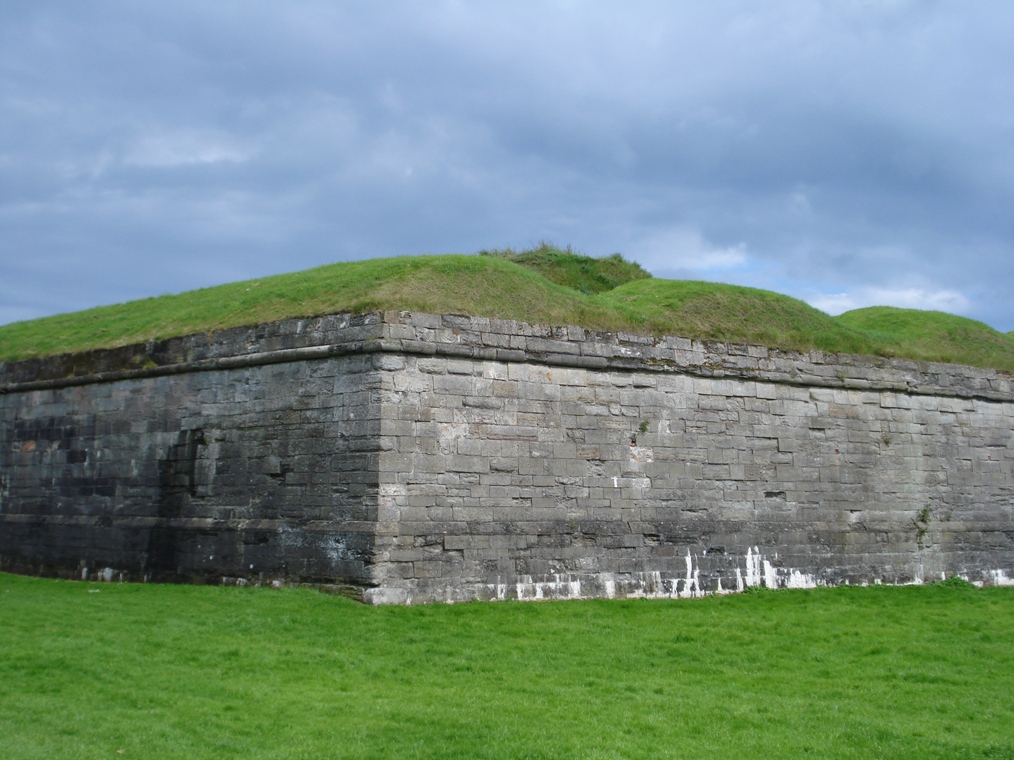
In the middle of the sixteenth century there was a remodelling of some of the defences here in Berwick. The cost of maintaining over two miles of the medieval walls was prohibitive. So it was proposed to remodel the defences based on the latest Italian design.
Why Italian? Well at the time because of the conflict between the Italian City States and foreign invaders Italy was at the forefront of fortress design. The main characteristics of the defences encircling Berwick are very high walls faced with stone, a broad walkway on top for patrolling troops and a series of projecting stone bastions shaped like arrow heads and used as gun platforms. The enormous wall that you can see from here is the corner of one of these bastions. This is known as Brass Bastion and, as the name implies, there was a brass cannon here.
Around the time that the Brass Bastion was built there was a new approach to the relationship between England and Scotland. Henry VIII had designs on the Scottish crown and he hoped by marrying his son, the future Edward VI, to the young Mary, Queen of Scots, future generations of Tudor monarchs would not only be Kings or Queens of England but of Scotland as well. Not surprisingly Scotland was none too keen on this and so in 1547 the Earl of Hertford launched his ‘rough wooing’ invasion of Scotland to try to force the betrothal.
Continue along the path with the walls to your right. Join the road and follow it round to the right. Stop just before the gateway
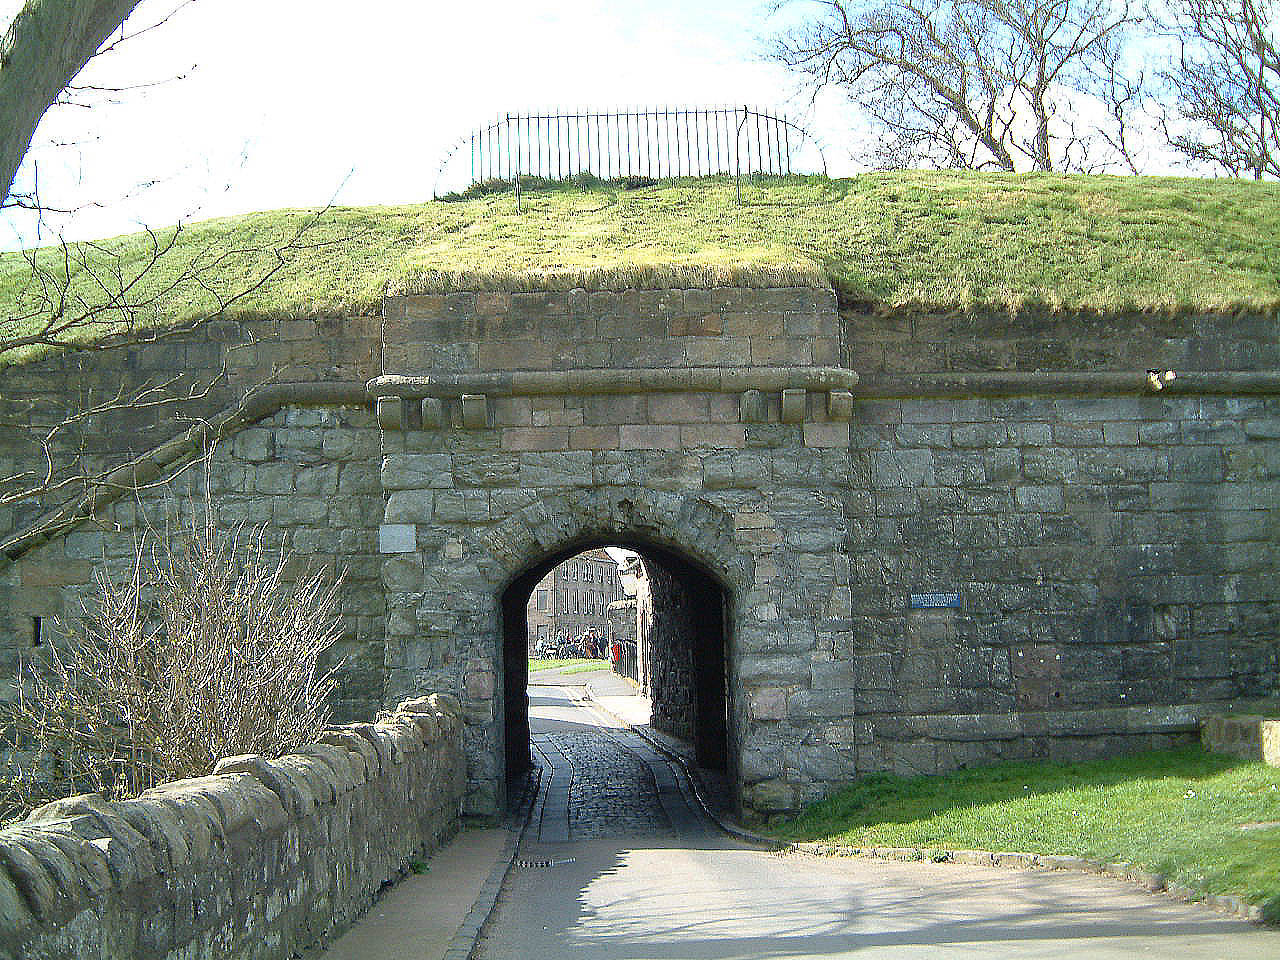
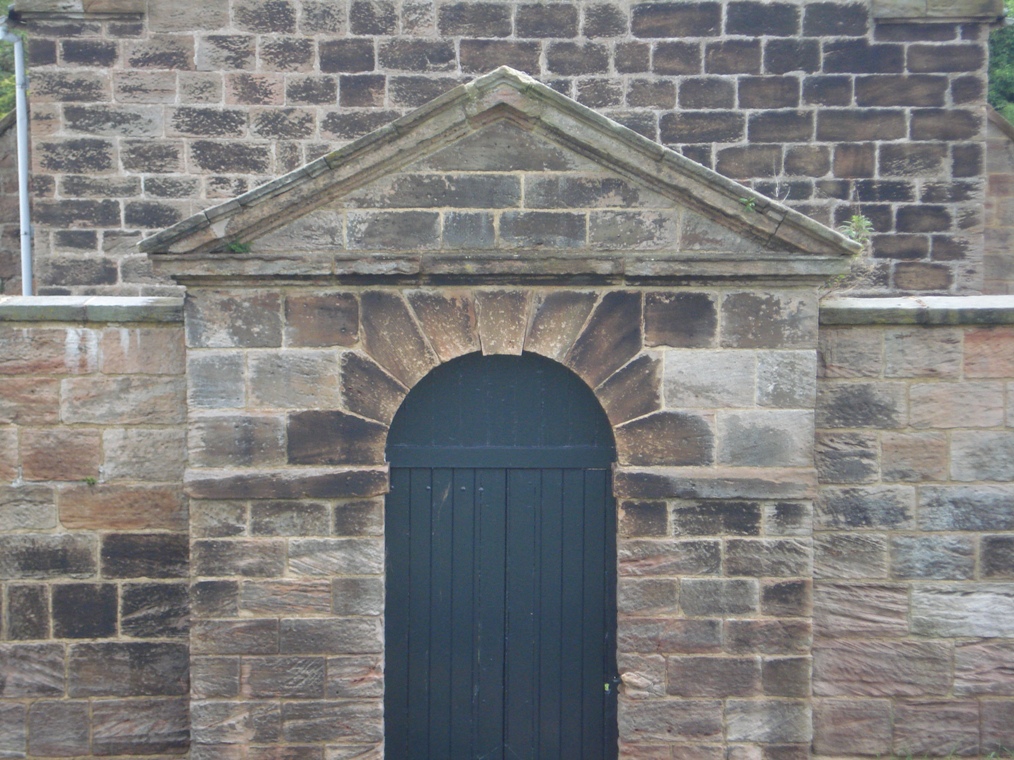
10 A gate for cattle
If you are going to encircle a town with defensive walls you still need ways in and out. This is one of the gates into the town. It is known as Cow Port because it is where cows were taken out to grazing pasture outside the walls during the daytime and returned at night.
At night strong wooden doors were closed and backed up by an iron portcullis. Inside the gateway, running from floor to ceiling, you can still see the deep grooves which held the portcullis when it was lowered. The gate was used for cows until the 1940s.
Gateways such as this were the most vulnerable part of the town’s defences which is why it is deliberately narrow and small. There were actually more elaborate plans to increase security here and the illustration on the information board shows what it was intended to look like. The grassy areas either side were to be a ditch filled with water and the roadway would cross the ditch on stilts and across a drawbridge. Works on a pipe in the road revealed substantial stonework which may have been one of the stone piers.
Go through Cow Port then through the gate on the right and up the slope onto the ramparts. Where you meet the main path turn left with the church on your left hand side. At the corner you may wish to go up onto Brass Bastion on the right. Turn left and follow the path along the ramparts. Stop at the next mound.
11 A time of peace
Here we are at another of the features constructed during the mid-sixteenth century remodelling of defences. As we heard earlier, a bastion is an angular structure projecting outward from the wall of an artillery fortification and this is one of the best preserved bastions. It was originally called the Middle Mount but renamed Cumberland Bastion after the Duke of Cumberland who passed through Berwick in 1746.
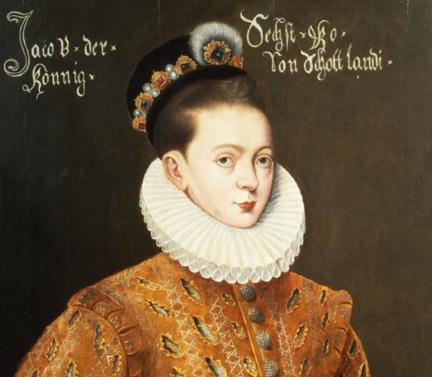
Next in our timeline comes a period of peace in Berwick because the monarch of the two countries was the same – James VI of Scotland became James I of England.
The kingdoms of England and Scotland were individual sovereign states with their own parliaments, judiciary and laws but they were both ruled by James in a situation called “personal union”. The town’s garrison was reduced and the population could enjoy a time of stability. But this was short-lived. By the end of the 1630s Berwick once again found itself on the front line.
After James I came his son, Charles I. Charles’ reign was characterised by religious conflicts. Among other things in an attempt to establish a national church he tried to impose the Church of England prayer book on the Scots. That didn’t go down well and led to rebellion by the Scots. Of course Berwick’s position between England and Scotland put it once again at the front line.
There were two wars known as the Bishop’s Wars. Berwick was occupied for the King by the Earl of Essex in April 1639. Then Charles came up to Berwick with his army and by June he signed a peace treaty with the Scots known as the Treaty of Berwick.
King James VI of Scotland and James I of England
Wikimedia Commons (Creative Commons License)
Directions
Continue along the path until you reach the bridge over the main street. This is the Scots Gate, built in the 1560s as the gate out of the town on the road to Scotland. The eastern pedestrian gate was added in about 1815 and the main arch was widened in the 1850s. It was the route of the main A1 road until the bypass was built in 1983. Shortly after going over the Scots Gate take the path up to the right. Stop at the viewpoint at the top.
12 The Scots invade again
This is Meg’s Mount, a bastion protecting the southwest corner of the town. The name comes from a cannon which stood here which was called Roaring Meg. Like the last two stops – Brass Bastion and Cumberland Bastion – it was part of the fifteenth-century remodelling of Berwick’s defences (although most of what you can see today dates from modifications in the nineteenth century.
The impressive defences at Berwick that you have been walking along cost £128,000 which was an enormous amount in those days. In fact Queen Elizabeth I spent more on Berwick’s defences than all other defences put together during her reign.
Despite the cost the project was doomed. There were criticisms of the designs, not enough tools, insufficient money and finally mutiny by the masons. For almost 20 years work limped along. Designs were altered and in some places compromises made.
At the last three stops – Brass Bastion, the Cumberland Bastion and Meg’s Mount – you have seen some of the key features of the Elizabethan defences. Meg’s Mount here was originally intended to be linked to the King’s Mount that we shall see a little later by a new line of ramparts. The new ramparts were begun but never completed due to spiralling costs and diminished threats so Meg’s Mount remains a demi-bastion basically ‘half-a-bastion’.
We heard at the last stop about the Treaty of Berwick which was a peace treaty between England and Scotland but it did not end the Bishop’s Wars. The following year fighting broke out anew and the Scots invaded England. The forces of Charles I re-fortified Berwick but the Scottish Army crossed the River Tweed further upstream and Berwick remained in the King’s hands.
By 1643 the entire country has been engulfed in the English Civil War which pitched the ‘Cavalier’ armies of King Charles I – against the ‘Roundhead’ armies of Parliament. The Scots were allied to Parliament. They occupied Berwick, successfully resisted a Royalist attack and then used Berwick as the base for an invasion of England. Berwick then remained in Scottish hands until the end of the Civil War. At the Restoration of the monarchy in 1660 Berwick’s garrison was again reduced and the town once more looked forward to a period of peace.
Retrace your steps down from the viewpoint. Turn right along the path and down to the gate. Continue straight along the lane and follow it as it bends round to the left. Where the lane splits take the right pedestrian fork. Follow this path down the slope and under the road bridge. Follow the signs for Coast Path which take you along Bridge Terrace. Stop at a convenient place between the Royal Border bridge and Royal Tweed bridge.
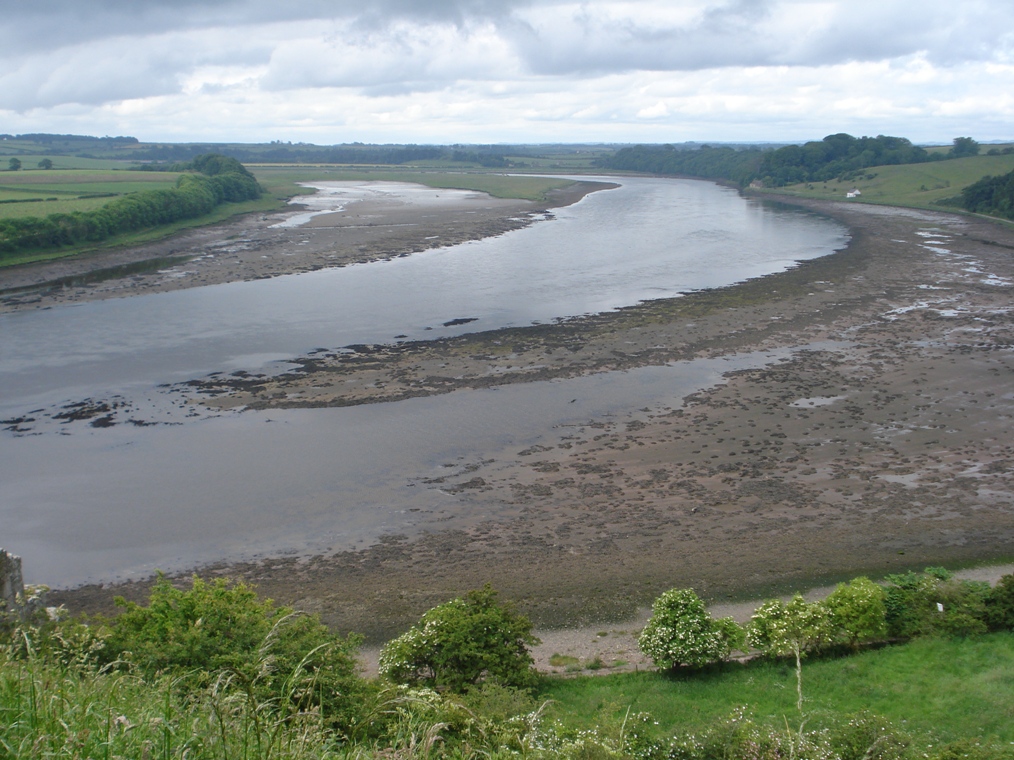
13 Crossing the river
We’re now about half way around our walk and we can pause our historical story to look at another geographical feature of the town – the river and the bridges.
We have heard about the English advancing into Scotland and the Scots pushing into England. The natural barrier of the River Tweed – Britain’s tenth longest river – was an obstacle for both sides as they moved troops and supplies northwards or southwards.
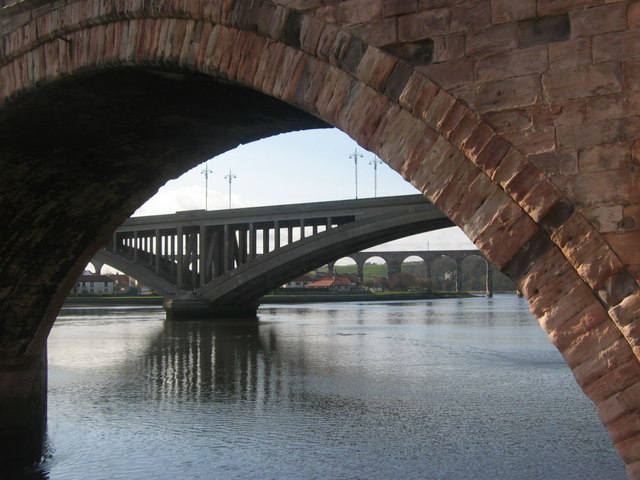
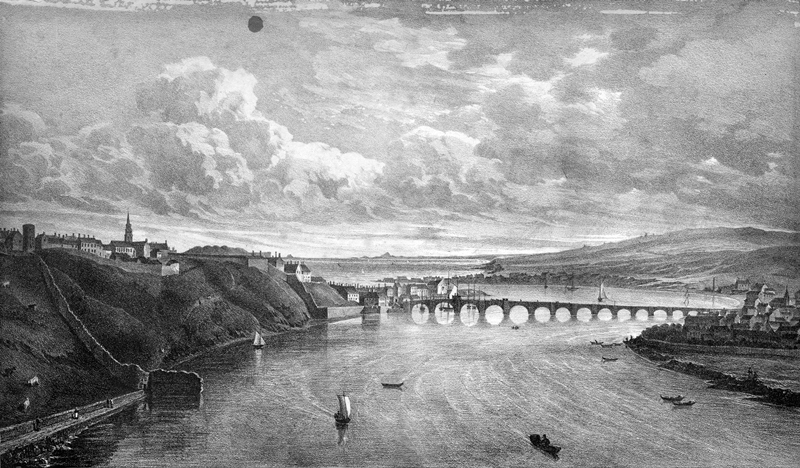
There are records of a bridge here in the twelfth century. We know that the first bridge was swept away in a great storm in 1199. Its replacement lasted less than a century – that was also swept away by a flood in 1285. A gate was constructed in 1313 with the intention of linking it to a bridge but in fact the town went without a bridge until 1401. This third bridge was rebuilt in 1490. So the ‘Old Bridge’ that you see today is actually the fourth bridge to cross the river. It was built between 1611 and 1633. The fact that it is 355 metres in length gives us an idea of the width of the river at this point and how difficult it would have been to cross the river before the bridges.
This bridge was the primary north-south traffic route for the next two centuries. It would have been well-used by local people to bring goods and livestock into Berwick from Tweedmouth, the village on the other side of the river, as well as places further south. There were alterations and the removal of the gatehouse in 1825 but it continued in service until the Royal Tweed Road Bridge was built upstream in 1928.
It is the railway viaduct that dominates the view, though. The nineteenth century saw massive expansion of the railway network. The North British Railway’s line down from Edinburgh reached the north side of the River Tweed in 1846. Meanwhile the Newcastle and Berwick Railway’s line up from Newcastle reached the southern bank of the River Tweed a year later in 1847. A stone viaduct across the river was commissioned to allow trains to run through from Newcastle to Edinburgh. Work progressed slowly so a temporary wooden bridge was built until the stone one was completed.
It was opened by Queen Victoria in 1850. Interestingly it is called the Royal Border Bridge which reflects our story of Berwick situated on the border between England and Scotland. The viaduct still carries the East Coast Main Line. There’s a spectacular view of the town and river from the viaduct so if you’re leaving by train southbound do make sure you look out of the window.
Continue along Bridge Terrace. At the old bridge you may wish to walk a short way onto the bridge to enjoy the view. When you are ready continue along the flagged walkway called Quay Walls which is signposted Coast Path. Stop part way along Quay Walls.
14 Neither English nor Scottish
Earlier in our walk we talked about rivers often being boundary markers. Here on the riverside we can pause to think again about Berwick as a border town and its uncertain identity.
In terms of the stone and architecture Berwick has the feel of a Scottish town. It is also on the northern bank of the River Tweed which is classed as a Scottish river.
The old county of Berwickshire was in Scotland and Berwick is closer to the Scottish capital city of Edinburgh than it is to Northeast England’s regional centre of Newcastle-upon-Tyne. Most of the town’s commercial banks are Scottish and the local soccer team plays in the Scottish league.
Yet the English influence upon the area is also very significant. Berwick’s policeman and laws are English and its most senior councillor is an English mayor and not a provost as in the Scottish system of local government.
The local dialect can also lead to the belief that Berwick is Scottish. To most English people the local `Tweedside’ accent spoken in Berwick sounds Scottish although most Scots would recognise the Northumbrian influence! So to this day many inhabitants consider themselves neither English nor Scottish but ‘Berwickers’.
Heraldic badge of Great Britain
Wikimedia Commons (Creative Commons License)
Directions
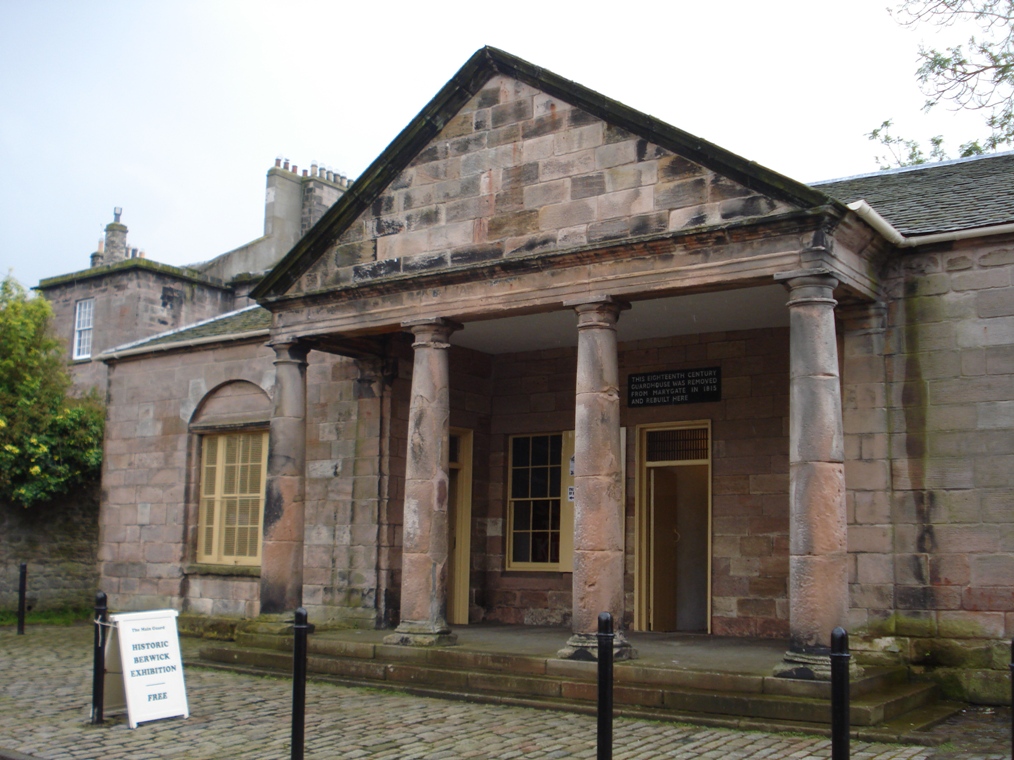
Continue along Quay Walls until you reach a grassy area by the Main Guard. Stop here.
15 The defenders of Berwick
So far we have looked at Berwick’s impressive walls, towers and bastions but these physical defences also needed to be manned. In the eighteenth century when this guardhouse was built there were several hundred soldiers stationed in Berwick. There was a Military Governor and his Deputy, a Town Major and Town Adjutant, a Master Gunner and six gunners plus three companies of infantry. Most of the soldiers were ‘invalids’ who were unfit for overseas or frontline service.
This building was the Main Guard. There had been a Main Guard building of some sort in the town since at least 1682 but it was rebuilt and moved several times. This building dates from the eighteenth century and was originally in Marygate – the main street – but moved to this position in 1815. The main purpose was to house soldiers on guard duty, to provide a secure place for holding the drunk and disorderly, and to enforce curfew by guarding the town gates during hours of darkness. There was a room for the officer on duty (on the left as you go in), a room for the solider on guard with benches and a fireplace, and a cell or ‘black hole’ for any prisoners.
The Main Guard has been renovated by the Berwick Civic Society. It is open from June to September in the afternoons (closed on Wednesdays) and is free. Do go into the building where the displays have a range of historic images, maps, diagrams and models giving much more information about Berwick’s military and trading history.
When you are ready continue along the walkway. As you walk along notice the stone bases where cannon would have stood. Where the wall makes a sharp turn to the left is a tower on the corner. Stop here or go up onto the top if you wish for better views of the river estuary.
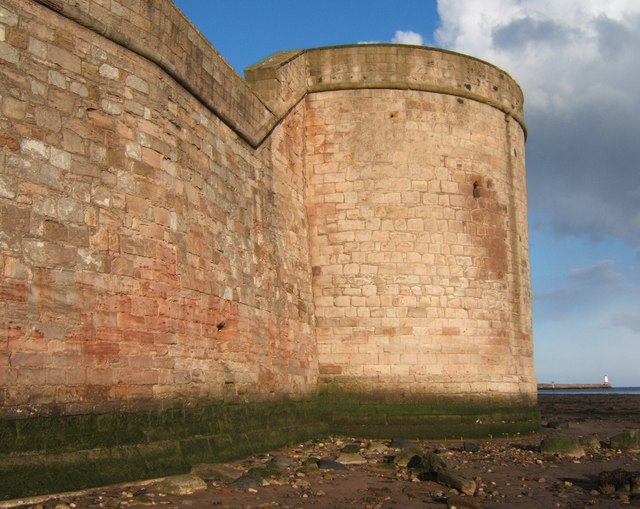
16 Attack from the sea
From this tower we have our first view of Berwick’s position at the mouth of the River Tweed. Berwick has a commanding position, overlooking the first crossing point across the Tweed, guarding this section of coast and overlooking approaches from the south.
Our story so far has been all about Berwick’s position between the English and Scots but attacks did not only come from the land.
For example in 1333 during what became known as the ‘Great Siege’ of Berwick the English attacked from both land and sea with the English ships coming close enough to the riverside walls for the soldiers to fight hand-to-hand against the Scots defenders. Furthermore in 1355 a small force of Scots landed from the sea, overcame the sentries at the Cow Port and took the town by surprise.
There was originally a tall round medieval tower here. After those attacks by the Scots a new platform for guns was added. It became known as ‘the tower within the stone bulwark in the sands’. However it was so close to the sea that gunners and their guns could not be kept dry. There were significant repairs carried out in the 1500s and further alterations in the 1700s with a new parapet for infantry and guns placed along the walls on either side of the tower. At this stage it became known as Coxon’s Tower.
From Coxon’s Tower continue along the walkway past the cannon at Fisher’s Fort. Go through the gate. You can follow the paved path straight up onto the next hill or follow the grassy path alongside the wall to the right. Stop on the top of the plateau.
17 Rebellion
The last we heard in our chronological history of Berwick was the end of the Civil War with the restoration of the monarchy in 1660. Unfortunately prospects of a peaceful future for the town were once again short lived. At the end of the 1680s Catholic King James II was removed and replaced by the Protestant monarchs William and Mary but the House of Stuart was not about to give up its claim to the throne quietly.
The House of Stuart had its supporters – some Scots, some Catholics and others. The next 60 years saw four uprisings in support of the Stuarts known as the Jacobite Rebellions. These rebellions were largely centred in Scotland and Berwick once more found itself in the firing line!
This is the King’s Mount and was named in honour of the visit of James VI of Scotland on his way to London to be crowned James I of England in 1603. It was designed to be linked to Meg’s Mount that we saw earlier by a new line of ramparts. As we heard earlier this wall was never built and as a result the King’s Mount was never completed as designed although what was built is still visible today. The final repairs to the walls were in the wake of the 1745 Jacobite Rebellion and from thereon few changes were made to the walls (although there were some proposals for major revisions).
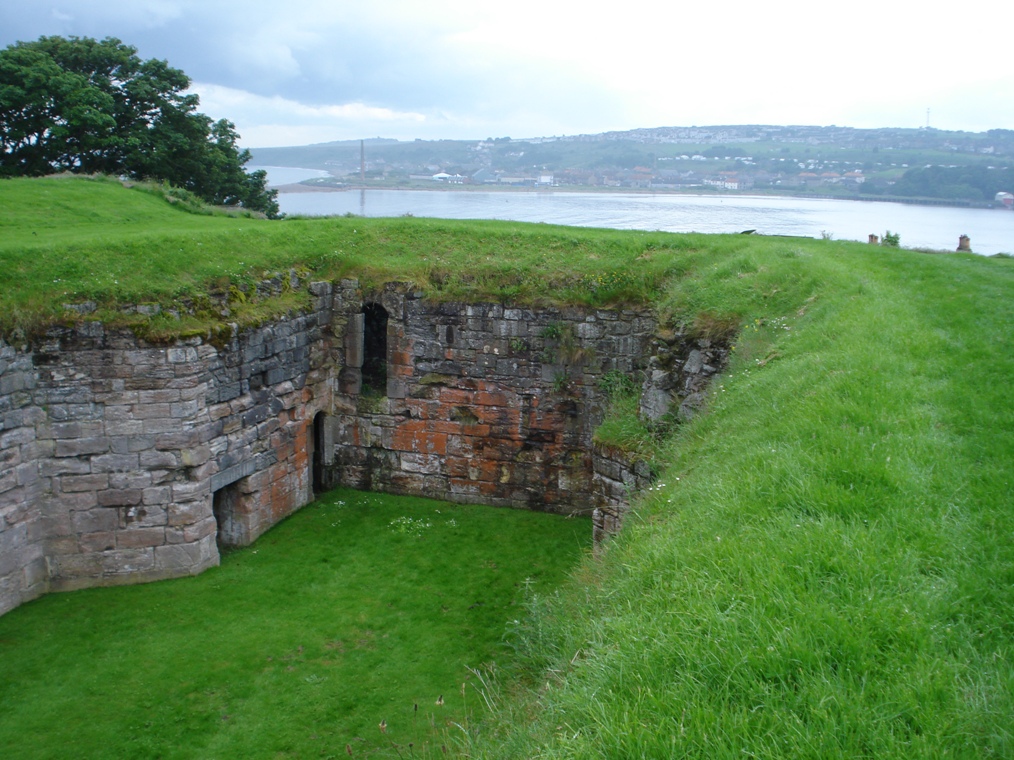
Continue along the paved path. Immediately after a path leading to a house is a building in a walled enclosure. Stop near this building.
18 What a blast!
The walled enclosure and building inside is the Magazine, the principle gunpowder store. Built between 1749 and 1750 it could store as many as 624 barrels of powder. With so many barrels it is no surprise that the magazine was carefully designed to prevent accidental explosions. There’s a strong perimeter wall and the outside of the building has strong buttresses. Inside all the metal in the building is non-ferrous – copper rather than iron – to minimise the risk of sparks. The design of the building is such that any blast would be sent upwards. Anyone working in the magazine was required to wear a special uniform and soft boots.
Continue along the paved path. Go up onto the next mound and stop where there is a beacon.
19 The longest war?
As we have heard throughout our walk Berwick changed hands almost more times than can be counted during the Middle Ages.
Berwick last fell to the English in 1482 but it was still not regarded as a true English town; it was seen as a foreign outpost like Calais. In a treaty of 1502 Berwick is mentioned as “of England but not in England”. Because of the ambiguous identity some proclamations referred to “England, Scotland and the town of Berwick-upon-Tweed”.
A story has grown that one such document was the declaration of war against Russia in 1853 which Queen Victoria is supposedly to have signed as “Victoria, Queen of Great Britain, Ireland, Berwick-upon-Tweed and all British Dominions”. However when the Treaty of Paris was signed in 1856 to end the Crimean War, peace was declared with Great Britain and her dominions but Berwick was not mentioned. Officially Berwick was still at war with Russia!
There’s no historical evidence for this so it’s more likely a local tale that has grown over the years. However, it is claimed that the mayor of Berwick sought to resolve the situation once and for all in the 1960s when he told a Russian diplomat: “Mr Ambassador! You may tell the people of Russia they can sleep peacefully in their beds at night”!
Berwick From Spring Gardens (1810-1840) by
William Henderson
Courtesy of Berwick-upon-Tweed Museum and Art Gallery
Directions
Descend from Windmill Bastion. Go round to the seaward side of the Windmill Bastion.
20 The French threat
We’ve just heard about the Crimean War in the mid 1800s. Between 1846 and 1871 there was also something of a ‘Cold War’ between Britain and France with rivalries and suspicions fuelling an arms race.
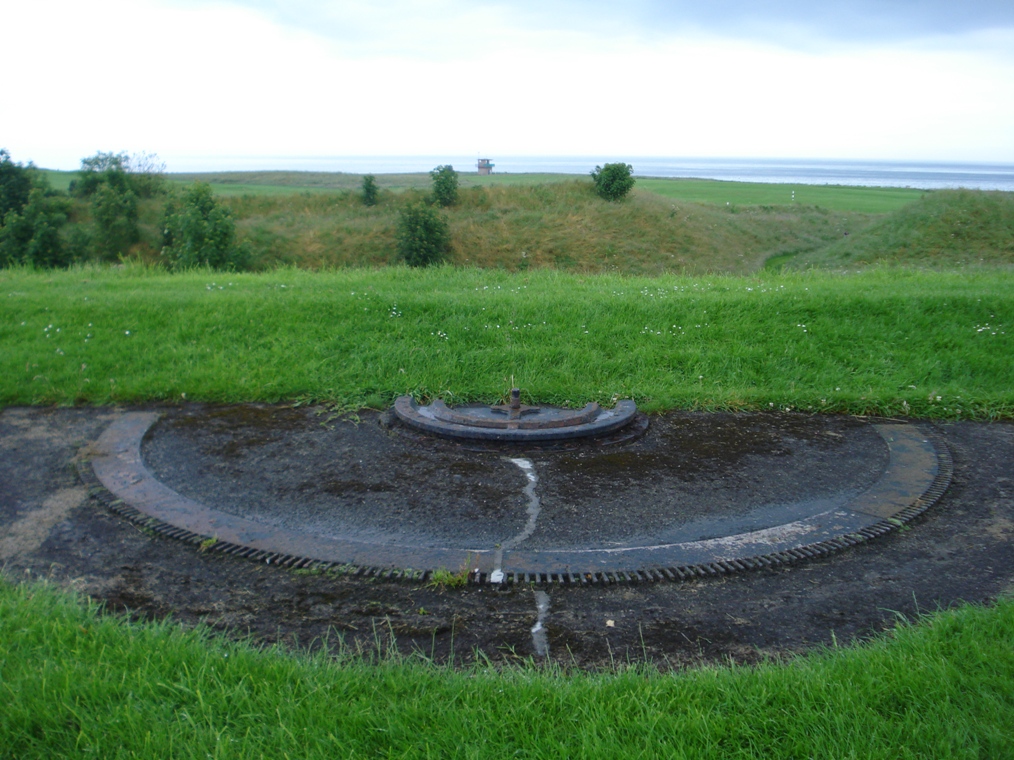
In 1858 the launch of the French armoured warship, ‘La Glorie’, virtually rendered Britain’s existing coastal defences obsolete. All around the coast defences were reviewed and in Berwick a new concrete gun position was built on top of here, Windmill Bastion.
The American Civil War followed by France’s defeat in the Franco-Prussian War of 1871 ended the French threat. The bastion was re-armed during the First World War but the guns were never fired in anger; indeed the guns were actually removed during the war to avoid Berwick being viewed as a fortified town open to bombardment by the German fleet.
During the Second World War Berwick suffered 11 bombing raids during which anti-aircraft guns were fired from the bastion. Look to the terrace below for a series of concrete circles and semicircles in the grass; these were where the guns were positioned. This was the last of Berwick’s defences to be in active service.
Continue a short distance along the paved path then bear left down to the gate. Go through the gate and straight along the pavement. Stop outside the entrance gateway to the barracks on the left hand side.
21 A first for England
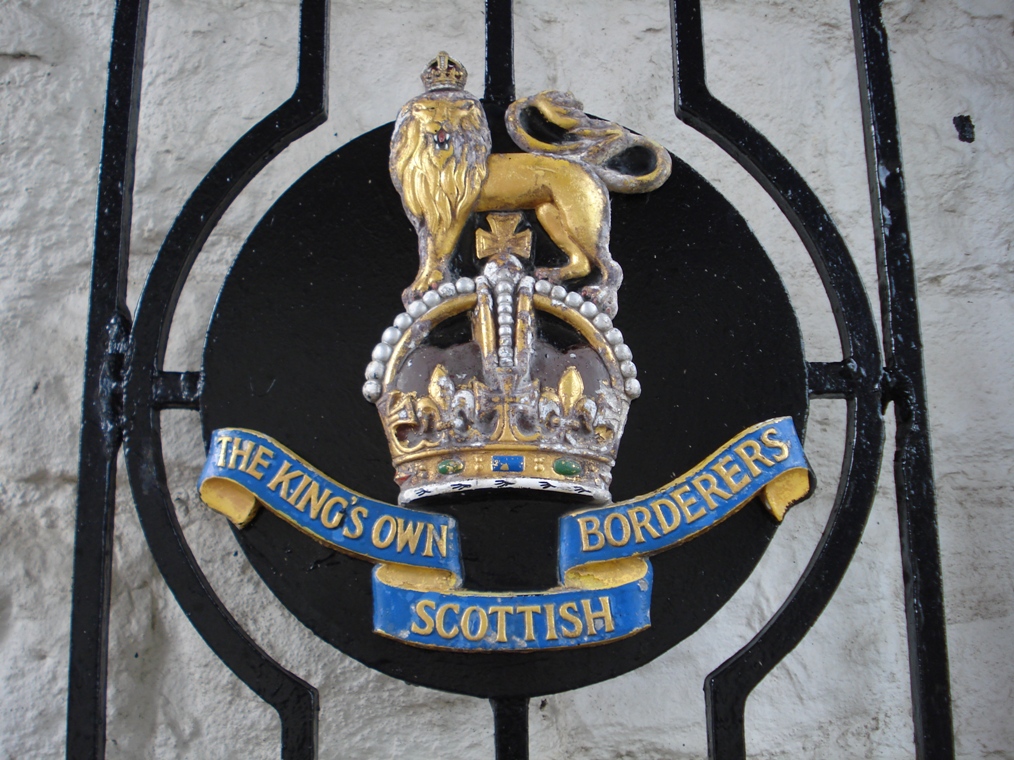
At the last stop we heard about the last of Berwick’s defences to be in active service. This building is the last of the town’s fortifications to be used by the military. Until 1964 this was the home of the King’s Own Scottish Borderers Regiment. You can see their crest on the gate.
This was the first purpose-built infantry barracks in England since Roman times. Until the eighteenth century the men of Berwick’s garrison were billeted in local taverns and private houses. Local townspeople had to bear the financial cost of this so it was unpopular. Added to this the town viewed the garrison with suspicion and were often hostile to them.
Requests from the town for a barracks had been ignored by the government. An investment in bricks and mortar for the comfort of soldiers was seen as a waste of money. However the Jacobite Rebellion of 1715 that we heard about earlier brought about a change of mind. The government also realised that designation accommodation was a way of containing soldiers and keeping them under supervision, away from local alehouses and out of sight of the local population.
So in 1717 the government ordered the construction of a barracks to hold 600 men and 36 officers. It was designed by the celebrated English architect Nicholas Hawksmoor and completed four years later. The south “Clock Block” was added in 1735. After further alterations in 1799 the barracks comprised 72 rooms for soldiers, 24 rooms for officers, a gymnasium and an extensive store.
The barracks are now under the care of English Heritage and include the Berwick Museum, the Regimental Museum of the King’s Own Scottish Borderers and the By Beat of Drum exhibition chronicling the history of the British soldier from 1660 to 1900. As you have seen throughout this walk military history is now part of tourism. You have visited one of the best-preserved fortified towns in Britain, possibly in Europe.
Emblem of the King’s Own Scottish Borderers Regiment
There is a charge to enter the barracks but you can look through the gate into the main courtyard. Remain outside the Barracks.
22 Past and present
This walk has told the story of Berwick. The town has a turbulent past. Its location on the northeast coast placed it on the frontline between England and Scotland. Through centuries of skirmishes, rebellions, wars and treaties, Berwick has been repeatedly in the firing line. It was captured, lost, recaptured and lost again.
For this reason Berwick has extensive military defences which have been variously built, destroyed, rebuilt, fortified, extended, demolished and remodelled over the centuries.
These defences took advantage of Berwick’s physical position on the steep cliffs of the River Tweed. The river on the south and the coast to the east provided a natural barrier. The landward sides of the town were encircled by walls punctuated by towers, bastions and formidable gateways. Many of the defences used new building techniques to embrace the latest in military design ideas and we also heard about developments in artillery too.
Although Berwick was a military town we have also thought about its citizens who have had to put up with invasion and attack, the continual presence of soldiers and a constantly changing identity. Today the military legacy is a mainstay of the local economy attracting visitors and tourists from Britain and beyond.
I hope you have also enjoyed visiting one the best-preserved fortified towns of Britain. Do take more time to explore the town. If you enjoyed this walk you may like to try other Discovering Britain walks about towns on the frontline of invasions such as Rye and Winchelsea in East Sussex, or walks about the impact of the military on the landscape on Salisbury Plain and in mid-Wales.
To return to the town centre or railway station walk past the front of the barracks along Parade then turn left along Church Street. This leads to the old town hall. Turn right up Marygate to return to the station.
Your browser is out of date, and unsupported by this website. Please upgrade to the latest version to use this website.
Berwick-upon-Tweed (1745), Berwick-upon-Tweed Museum and Art Gallery
Berwick-upon-Tweed walk
A circular walk exploring one of the best-preserved fortified towns in Europe
Did you know that the town of Berwick-upon-Tweed has changed hands between England and Scotland at least 13 times?
Things are peaceful today but Berwick has a dramatic history caught on the frontline of battles, rebellions, wars and skirmishes.
On this unforgettable walk enjoy magnificent views from Berwick’s castle, discover how locals have lived alongside the military for centuries and look for evidence of English and Scottish identity.
Follow the walk by clicking on the map pins or downloading the guides below